DIY Magnetic Bulletin Board
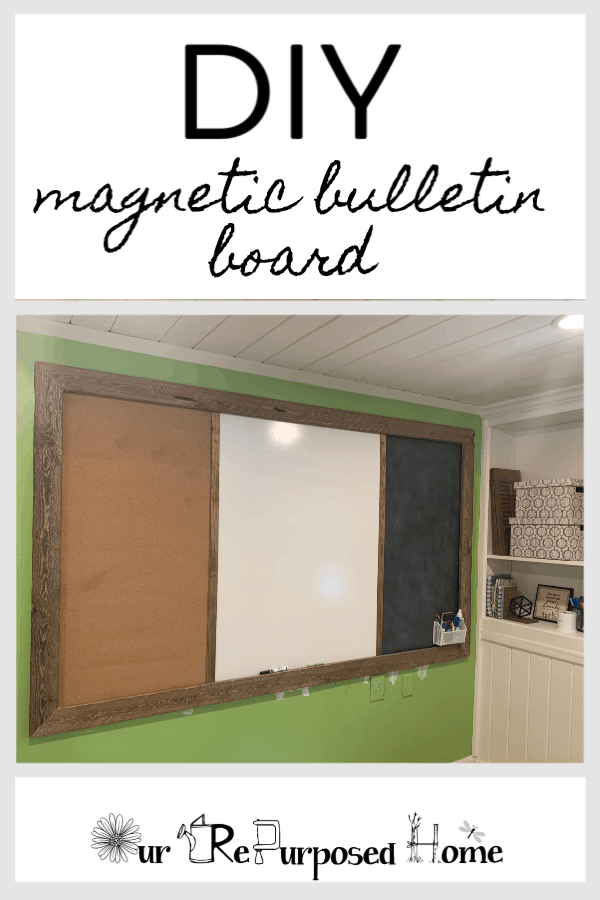
As part of my room redesign, I wanted to replace a combination bulletin board, that I made a few years ago. My grandchildren use this to play school. This board gets used a lot, but it isn’t exactly an attractive area in the room. So I decided to make a combination DIY magnetic bulletin board.
I really wanted to give the board less of a juvenile look. Plus, incorporate the farmhouse style that I love so much.
I also didn’t want to spend a fortune to replace this. So, I decided to build a new one that would look good in the room, even when the kids aren’t using it.

I decided on a wood framed, magnetic chalkboard, cork board, and dry erase board combo. Because it is so large and heavy, I will be installing each section directly to the wall. For smaller boards you may want to install the sections onto a piece of plywood, or other backing board first. Then attach it to the wall.

To read about other projects in this room redesign, and to see the transformation in progress, read my post “Room Remodel – Part One – Plan Your Room.” This post is the introduction to the entire room remodeling project.
This post may contain affiliate links. If you choose to purchase a recommended product, I may receive a small commission at no additional cost to you. This helps me to bring you this great content every week. Rest assured that I will not recommend any product that I would not use myself.
Read on below for the step by step directions to make your own combination DIY magnetic bulletin board.
- Decide on your measurements
Measure the area where your board will hang and decide how big to build your board. A good rule of thumb for hanging artwork or other items on your wall is to use about 2/3 of the available area.
- Determine your board layout
What do you want to incorporate in your board. Chalkboard, cork board, white board, magnetic or all of the above?
Decide on the layout. Do you want side by side, or top and bottom? Do you want equally sized sections or some smaller ones?
Draw out your ideas so you can easily picture how the board will look. By drawing a shape in the size of your whole board, you can then play with the available space inside to determine your best layout. - Shop for your supplies
To make your DIY magnetic bulletin board budget friendly, I have found some items that will allow you to make a large board relatively inexpensively.
White board – Go to the paneling section of your home improvement store. Look for white tile board. It’s a 4’x8′ sheet of smooth white paneling. Dry erase pens work great on this material. It will cost you around $13 for a whole sheet. You can have them cut it to the size you need at the store.
Steel sheets – You will need some metal sheets if you want to make your chalkboard magnetic. You can use sheet metal which is thin and easy to cut for around $10, but I prefer using a welded steel sheet because it’s sturdier and holds magnets better. I purchased a 24″x48″ sheet for $35.
Both types come in different sizes, but keep in mind that if you need to cut the sheet to fit your design, then the sheet metal may be your best choice because it’s thinner and easier to cut.
Cork sheets – For your cork board section you can either purchase a rolled sheet of cork and cut to size, or individual cork squares. Some are self adhesive, but I used a quick drying glue to hold mine to the wall as well as some small paneling nails.
Chalkboard paint – Use a spray chalkboard paint to cover your metal sheet to make it writable, erasable, and magnetic. I liked the spray paint because it goes on super smooth and you don’t have to worry about brush lines.
Wood for your frame – Depending on the size of your DIY magnetic bulletin board you will want to purchase appropriately sized wood boards to frame it. My message board is 4′ x 7′ so I used 1 x 4″ boards. If you have a small board, you’ll want smaller pieces for your frame.
You will also need smaller strips of wood to cover the seams in between each section of your board.
Glue / Nails / Screws – Depending on the material you choose, you will need the appropriate hardware to install it. - Cut all your materials to size
Once you have determined your layout, and know the measurements of each individual section, you can cut your materials to the correct measurements.
- Paint your metal with Chalkboard paint
Use a piece of sandpaper to scratch up your metal before painting to help the paint adhere better.
Then spray at least two light coats of the chalkboard paint to the metal letting it dry for at least one hour in between coats.
Let it dry overnight.
Condition your chalkboard by rubbing the whole board with the side of a piece of chalk, then wipe it off. - Attach the sections to the wall
Attach the whiteboard to the wall with panel board nails. These are really small nails made to hold whiteboard.
Attach the metal to the wall with screws and glue. You will need to pre-drill the holes in the metal before you attach it to the wall. Make sure if your using the heavier metal that you screw into the studs in the wall to prevent it from falling. Use an all purpose construction adhesive for added support.
Attach the cork board roll or squares to the wall using all purpose construction glue. You can use small nails to hold the edges while the glue dries. - Measure, cut, and build frame
Now it’s time to build the frame. Measure your whole DIY magnetic bulletin board to get the measurements for your outer frame. If you want your frame to look like a picture frame then you will need to cut your pieces at a 45 degree angle.
Measure the length of your board and make this measurement the inside cut of your 45 degree angle. Do the same with all 4 sides. Keep in mind if you want your frame to cover a bit of the board, (if you have a wide frame), then you will want to take a little bit off your measurements to shrink it down a bit so it covers the edges of your message board.
,
If you’d rather just do straight cuts, then measure the width of the message board then add the width of your boards x 2 so it extends past the message board on each side. For example: I used 1″ x 4″ boards for my frame, so I would add approximately 8″ to my width. Keep in mind that your actual board measurement will not be what it says on the board. It’s always a bit smaller, so measure your board to get the exact measurement. And if you want to cover part of your bulletin board, keep this in mind.
Then measure your height. Your side boards will sit inside your top and bottom frame boards.
Lay the frame on the floor and assemble it with wood glue and nails. Let it dry. - Attach frame to wall
Once your frame is dry then attach it to the wall using finish nails or a nail gun with finish nails.
Then measure and attach your wood strips on all of your inside seams with construction adhesive.

To see another one of my other favorite wood projects, check out my post “DIY Farmhouse Corner Desk”


