DIY Aesthetically Pleasing Cat Furniture
DIY Cat Furniture Inspiration
I love my cats and would do anything to make them happy. But being indoor cats they can sometimes get into trouble out of boredom. What better way to keep them entertained than to build them some custom DIY cat furniture?
Now, that being said, I am an interior decorator, and how my home looks is important to me. As much as I love my cats, I do not want to look like a crazy cat lady with a bunch of pet products all over the house. Not that there is anything wrong with that, it’s just not my thing. Which is why I decided to DIY my own cat furniture. This way it can be both functional and aesthetically pleasing in the room.
So, the inspiration came to me when I was torn between what to do with this weird “hole” in my living room built-ins and wanting a nice side table to go next to my recliner. The answer was to make a piece of furniture that could double as a table and a place for the cats to lounge and play.
FREE Catio Themed Project Planner
This all-in-one planner combines a stylish, catio-themed design with useful features like a printable monthly calendar, 30-day cat tracker, daily planner, to-do list, and a project planning sheet.
Below is a photo of the actual space where the cat furniture was going. You can see how I had this large “hole” in my built-ins where we used to have a large projection TV back in the day.
I used a piece of 1″ foam board that I covered with self-sticking wallpaper and wedged it in the space to cover all of the wiring for the entertainment system. The cats always thought those wires were for playing with!

This post may contain affiliate links. If you choose to purchase a recommended product, I may receive a small commission at no additional cost to you. Rest assured that I will not recommend any product that I would not use myself. For our full policies and disclosures click here.
These are the actual sketches I drew to put my idea on paper. I am not an artist by any means, but I think you can get a general idea of what I was going for.


I wanted to build a two-tier table/shelf with rope-wrapped PCV pipes for scratching, a multi-level, carpeted playhouse that opens up to the second tier, a fabric-wrapped tube for running thru, and a few different places for lounging.
DIY Cat Shelf
I decided to make my DIY cat furniture in an “L” shape. This shape would use the empty space in the built-in and wrap around under the window and snuggle up next to my recliner.
Now I could use the structure as a side table and a place for the cats to lounge under the window.
I also needed to incorporate “cat” stuff such as scratching posts, a cat house, a tunnel, and lots of places for them to hang out and crawl around.

You might like this…
I also built a Catio out of PVC for my indoor cats on my back deck and you can learn how I did that here. Read: “How to build a PVC Catio” They love it!
Now, I didn’t want this structure to look like a monstrosity in the middle of my living room. I did everything I could to make this sort of “blend” in with my decor and not stick out like a sore thumb. So, everything I did, I did with the sole purpose of making it design-friendly.
I started the project by building the actual framing of the shelves using (2 )- 4′ x 8′ sheets of 3/4″ birch finish grade plywood. I cut two identical “L” shapes out of the plywood in the exact dimensions I needed for the space. My dimensions are in the plans above.
Then I sanded them smoothly.
Like I said, I wanted this DIY cat furniture to coordinate with my existing furniture. So I decided to paint and stain the wood. I didn’t want the entire piece to be stained, so I painted a 2′ section on both pieces with the same paint color as the built-ins. It broke up all the stain and gave it a nice accent.

DIY PVC Cat Scratching Posts
Now I needed to figure out how I was going to attach these two pieces. I measured the space from the floor to the underside of the window. This told me what height I needed to make the second shelf.
I used 2″ x 10′ PVC pipes, that I cut 24″ long for the legs. Then I screwed 2″ pvc snap-in shower drains to the plywood where I wanted the legs to go. 3/4″ lathe screws worked perfectly to attach the shower drains and make them secure. Now the PVC pipes fit perfectly over the drains and we now have removable legs.
I know that sounds weird but those shower drains worked perfectly for connecting the legs to the wood. The link above for the shower drains is for a 3″ drain, not a 2″ drain. I couldn’t find the 2″ online but you will at least get the idea of what I used.
I wanted this cat furniture to be movable. Using these shower drains allowed me to be able to take it apart easily by just pulling out the PVC legs. However, I quickly realized that the structure wasn’t very stable when it wasn’t snug against the wall. So, I decided to glue the shower drains to the legs. It’s still pretty easy to move with two people so it all worked out in the end.

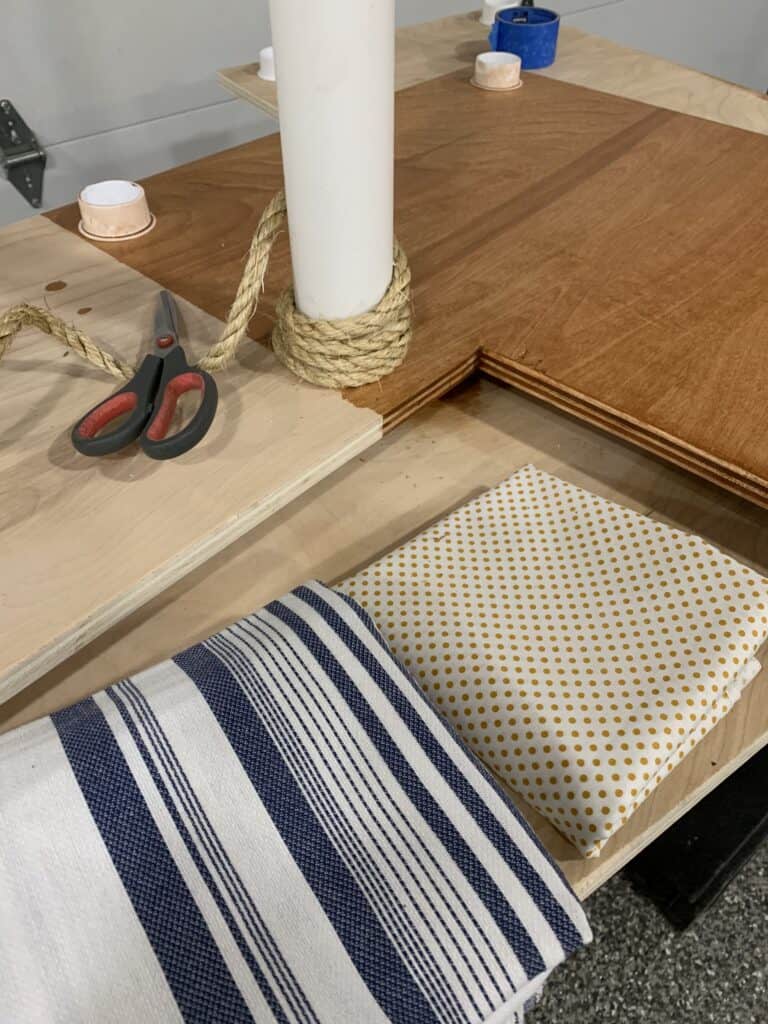
Making the cat scratch posts was easy. I took the PVC leg sections and started wrapping them with 3/8 x 50′ sisal rope. I started at the bottom and used hot glue to temporarily hold the rope. Then I also used Liquid Nails construction adhesive. This way the hot glue would hold the rope while the construction adhesive had time to dry.
I only glued small sections every 5 or so rotations of wrapping the rope. This is because I wanted to be able to replace the rope easily if the cats scratched it to death. If I glued the entire thing I would never be able to get the rope off to replace it.
Make sure when you wrap the rope that you pull the rope tight as you go around the PVC. Push down on the sections as you go to keep it nice and snug. Just put a little construction adhesive and hot glue as you go.
You can see how the caps look, and how I wrapped the rope around the PVC pipe below. BTW, it took one roll of the rope for each 2′ leg.

DIY Cat Tunnel
The next project was making the cat tunnel. My youngest cat LOVES to run thru tunnels. We have a pop-up tent that has a tunnel attached and he runs thru that thing a hundred miles an hour. So, I wanted to incorporate a tunnel into this project.
I purchased a cement tube used for pouring concrete footings. All I did was paint the tube and then glued some fabric to it. Easy-peasy!
I was just gonna attach the fabric straight to the tube. Then I realized that I could see the writing on the tube thru the fabric. So, I used some white spray paint to cover the writing and that did the trick.
Then I attached the fabric using hot glue. I wrapped the fabric around the tube openings and finished off the edges by hot gluing a strip of ribbon to the inside edge. I think you could just as easily use duct tape instead of ribbon for a nice finished look.


You might like this…
If you like to spoil your cats then why not give them their own space in your home? I wrote a post with lots of inspiration, projects, and products to make the best Cat Room ever! Read: “Awesome Cat Room Ideas for your Home”
DIY Cat House
I wanted to make a little house for the cats to crawl around in. I used 1/4″ plywood sheets that I cut to the height of the shelf. Because the plywood was so thin I attached 1″ x 1″ square dowel pieces in the corners for support.
Before attaching the sides together I cut a door in two of the pieces using a stencil I made for the rounded top door shape. This way the cats could access the house from the front and go out one side towards the tunnel.
The finished house measured 20″W x 20″L x 24″H. It basically was a cube without a top or bottom.
For the inside, I made a shelf that measured 19.5″ x 8.5″. Then I attached it to the inside walls using a few pieces of 1″ x 1″ wood strips for support.
After I decided where I wanted to put the house inside the shelving unit, I cut a hole in the top shelf. Now the cats could crawl out of the house and up to the second level using the shelf inside the house as a step.
Then I cut up a piece of carpet runner for the floor of the house and cut another piece to cover the shelf. I attached the shelf rug with construction adhesive, but the rug on the floor of the house is just sitting on the bottom shelf.


The Finishing Touches
I did make some last-minute purchases to finish off the look. The wicker chair pet bed and artificial plant from HomeGoods and the fabric pet bed from Walmart.
I also used some extra rope from the project and attached some cat toys to it. I hung it from the underneath side of the built-ins.
That’s it! Other than some issues I had with some of my tools, it all went together very easily.

You guys, I love building projects for my pets! Tell me what you think and give me some ideas for another project!

more great cat posts…


Hi Lori, I loved the cat house you designed and your cats 🐈 look like their right at home. It blends right into your living room and doesn’t take up space. Spring sprucing up ideas are what I needed to get motivated. First thing I open the windows for fresh air and clean in chunks of time like two or three kitchen drawers. The bathroom is easier to finish cleaning than the larger rooms. We have 1/3 of an acre so yard work starts in spring through fall. I read your blog, flipping homes takes dedication and organization.
Thanks Karen, I’m glad my spring tips got you motivated. We’ve had a couple nice weather days here and the windows are open 😊
This morning I was cleaning the guinea pigs cage and I always let him run around the living room while I do it. He went right for the cat house, thru one door out the other and thru the tunnel! Looks like the cats aren’t the only ones that enjoy it 😂