How to Make a Family Calendar in Excel
Let me show you how to make a family calendar in Excel and organize all of your appointments, commitments, assignments, and more. You can customize the calendar however you wish with colors, date, text, and images.
The idea for the Excel Family Calendar came to me when I was wondering how moms today manage to keep track of all of their kids activities. They are always on the go. So when I learned how to make my own calendar in Excel for work I new this would be a great way to organize all of those activities into one easy to read calendar. Actually this would be great for anyone who needs to organize their life on one piece of paper. Let me show you how you can make your very own, custom family calendar in Excel.
Excel
Excel is a program that you may already have on your computer. It comes with the suite “Microsoft Office.” If you don’t have it you can purchase and download it right from the Microsoft website. It has an online monthly service that gives you access to the whole suite. It’s a great tool with many home organizing templates for you to customize.
If you’ve ever opened this program before it can look a little intimidating. But it’s really not. I’m going to walk you thru the whole process of just how easy it is when your working with a template. Have your Excel open and we can create your own calendar together.
Step 1
Open a new workbook by clicking new and pick any year one month calendar and click create
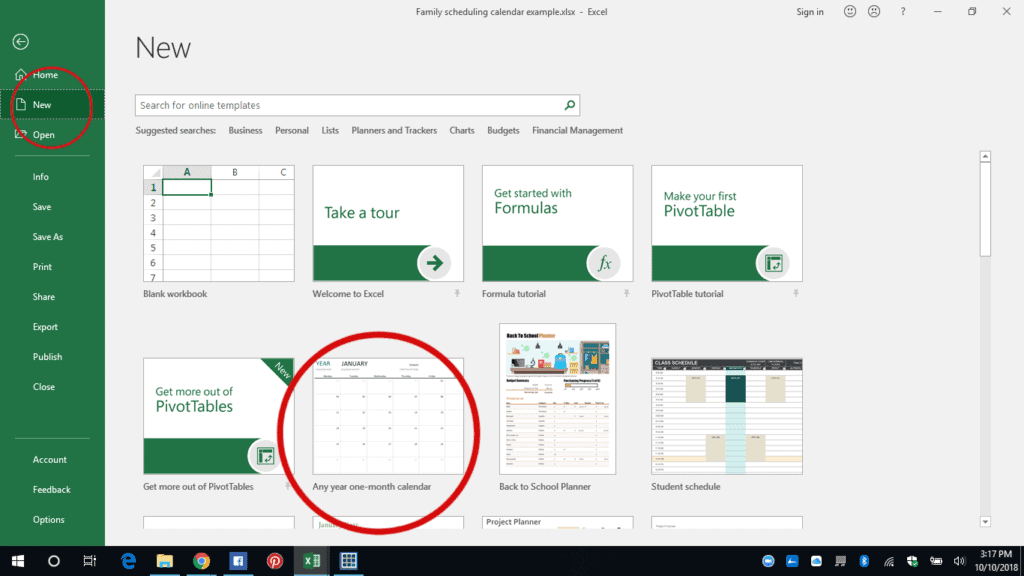
Step 2
Change your calendar month and year. Just click on them and type in the correct information. The workbook will automatically change your calendar days for you.
You will also want to tell Excel what size you want your new calendar to print. Just click Page Layout in the top menu and then click on Letter size to print on a plain sheet of paper.
Click File and Save As to name your new Excel DIY Family Calendar . Make sure to continuously click save throughout the process just to make sure you don’t lose all your hard work by accident.
Step 3
Click on insert in the top menu then select shapes. Choose a rectangle and insert. Now click anywhere you would like to add a box and click and drag the shape across the box until you have your rectangle. Make your box the size you want so it fits inside that day’s box.
Step 4
To change the color of your box highlight it. Then go to home in the top menu and click on the arrow next to the paint bucket and you will get a drop down menu of colors. Click which ever color you want your box to be and it will change.
Step 5
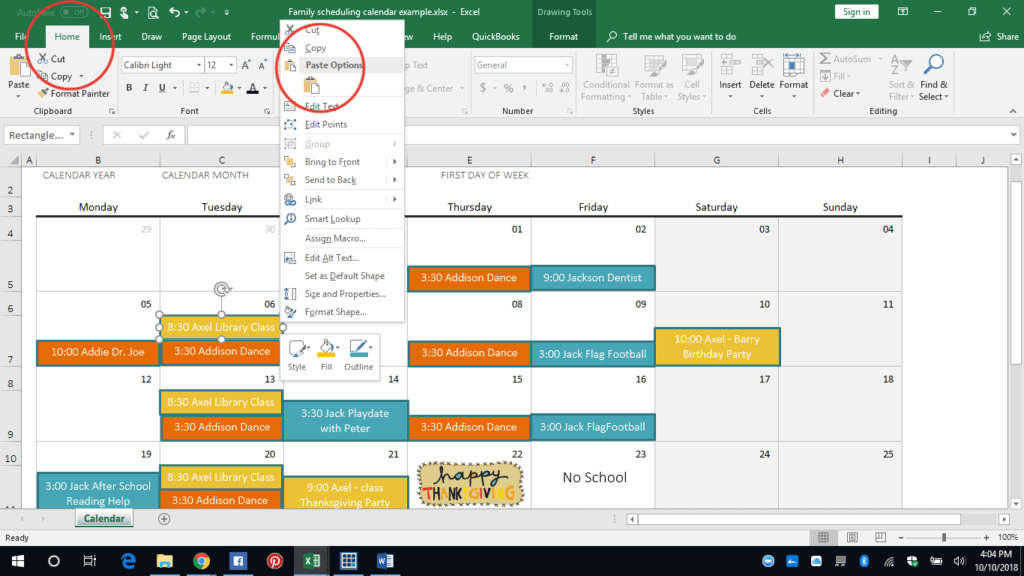
Next you’ll make more boxes with a color for each member of your family. Click on the box you just made to highlight it then right click to bring up a drop down box. Click copy then click somewhere on your calendar and click paste. This will give you a duplicate of your first box.
Now you’ll want to change the color of this box the same way as the first box in step 4. Repeat for each member of your family. Hint: When you paste choose the option that says “keep source formatting.” This way it will copy the box exactly as it is. If you don’t have options just click the clipboard under paste options. If you hover over the clipboards the formatting option will pop up. Also make sure you see the 4 arrows when you select the box before you copy. I noticed if I didn’t do that, then the box would copy, but not any text in the box.
Step 6
Now that you have a colored box for each family member you can add text to the boxes. To do this highlight your box by clicking on it. Then go to your text options in the toolbar and choose the font, size and color of your text. Then type your information into the box.

You can also just add text directly into the calendar by clicking anywhere and typing, but where’s the fun in that? LOL
Step 7
You will want to choose your alignment of your text in each box now. This is important because you will be using shortcuts later to copy and paste and you won’t want to have to change the alignment in every single box individually. To center your text in the box click on your box then click the alignment tab in the toolbar and choose to center diagonally and vertically.
To add another box of the same color, but with different information, just copy and paste any box of that color into a new location and re-type the information in the new box. No need to make a whole new colored box each time you add a new activity.
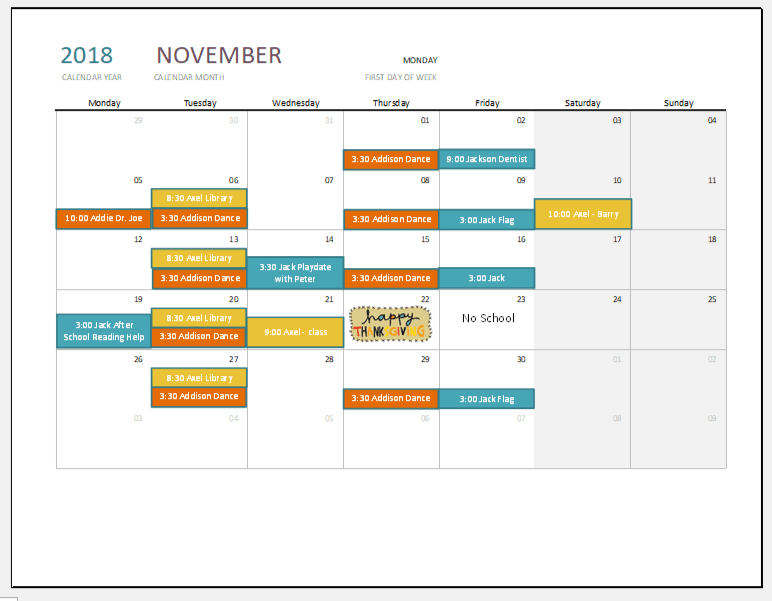
Hint: If you have a lot to type and it won’t fit on one line in the box then just click and drag the top button on the box to make the box bigger and you will see all of your text. * You can see in my illustration below that Jack has a play date on Wednesday the 14th. I needed to make the box bigger to fit all the information. You could also make the text smaller as another option.
In my boxes I put the time, the child’s name, and the activity. You can add whatever information you would like. Hint: If your child has the same activity on more than 1 day, just click on the box to highlight it, then right click to copy and paste onto a new day. Make sure you see the little 4 arrows in the box when you highlight it in order to copy and paste all the info.
Step 8
Now is the time to make it personal by adding graphics. Go to Insert then Pictures or Online Pictures and choose an image. You can use files from your computer or pick a graphic that is online for personal use.
This is how the Online Pictures screen will look. Just type a topic in the search bar and scroll thru them. Click on the image you want to use then click Insert at the bottom. Once its in your calendar you can click on it and drag it to where ever you want it. Resize the image box just like you did with the colored boxes.

Step 9
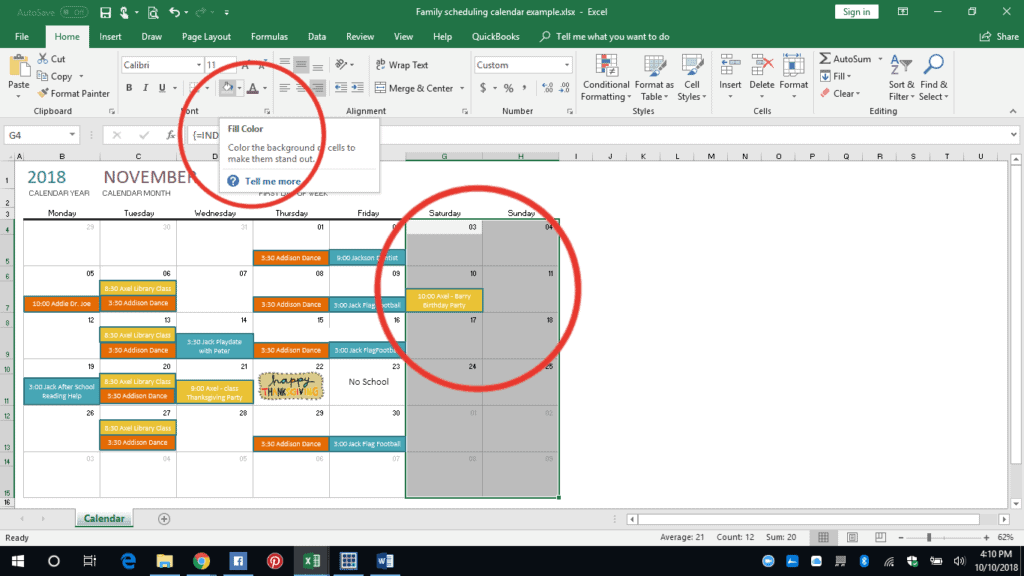
You can also change the background color of the calendar. I chose to change the boxes for the weekend to a grey so those days would stand out. To do this click and drag the area you want to change to highlight it. Then click on the paint bucket arrow, choose the color you want, and it will automatically change it.
Step 10
Use your calendar file as a template to print another month. Just reopen your file in Excel, go to file then click “save as” instead of save and rename it. This way you will save a copy of the original calendar while working on a new one. Then you can change or delete boxes, as needed, the same way you did to create it, instead of starting from scratch. This is a time saver if you have a lot of activities that do not change month to month.
That’s it! Now you have an Excel DIY Family Calendar that you can print out and hang on the fridge, keep in your planner, or throw in your purse.
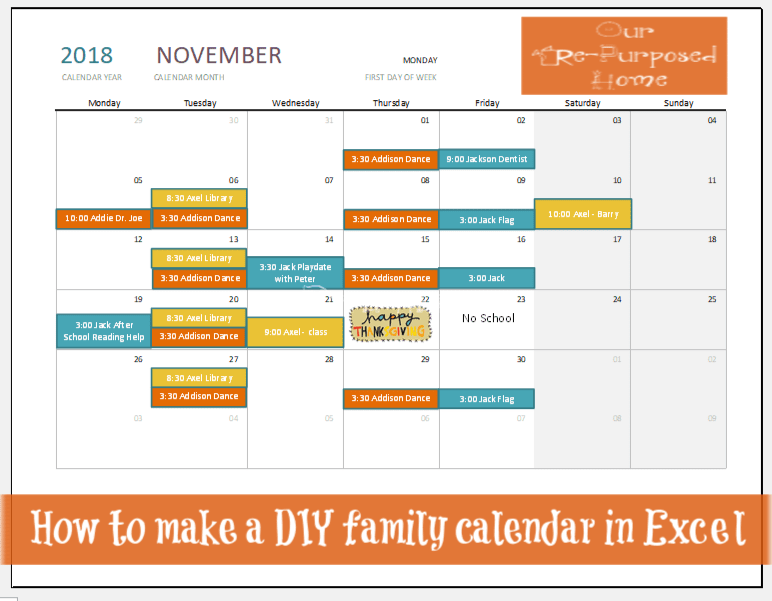
Here is a copy of my finished calendar
Ignore the missing lines in the calendar. I used the print preview window to screen shot the image and it left out some grid lines. This will not happen when you print.
If you have any questions on how to make your own calendar, please feel free to comment or email me and I will walk you thru it.
Here are more related posts for you…


